- 1
- 2
- 3
- 4
Category Archives: repair
Vicitra Veena massacre
… without words …
Technical info on strings & tuning:
Baj tar: steel 0,37mm (N°5) tuned to F#2 (MA)
Sa tar: bronze 0,46mm (N°26) tuned to C#2 (SA)
PA tar: bronze 0,56mm (N°24) tuned to G#2 (PA)
Laraj: bronze 0,72mm (N°22) tuned to C#1 (SA)
Kharaj: flatwound bronze 0,92mm (N°20) tuned to G#1 (SA)
Cikari’s: steel 0,30mm (N°3) & 0.28 (N°2) tuned to C#3 (SA) & C#4 (SA)
Tarav’s: steel 0,28mm (N°2)
Tumba cosmetics repair
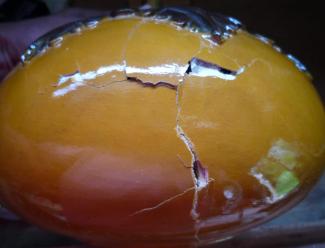
It began with an ordinary crack. Yet another case of overzealous luggage handling at airports. Very regrettable, but in this case it revealed an underlying and overwhelming problem.
A tumba is made out of a gourd, which is a natural product. As it grows on the field, the shape becomes more or less irregular, as squiggly as nature can be. But in a musical instruments setting this isn’t always very usable or good-looking…
Thus here and there some cosmetics are necessary to give it a more practical, handsome round shape. To obtain this, in general, plaster is applied. But sometimes regular plastering isn’t adequate. When more than a couple of millimeters difference in levelling needs to be adjusted a heavier and stronger filler is needed. Then sawdust, wooden dust, water and woodglue are well mixed and applied prior to the plaster mixture.
On this sitar it seems that the mixture has been made with a persistent shortage of glue. And, secondly, really a massive amount of this poorly mixed material has been used. The obvious reason for this is that the original tumba was of a critical quality. Now it is clear that it is just too thin and weak. At several places the tumba is hardly 2mm thick.
Thus, when repairing the crack, more and more chunks of almost already pulverised wooden dust filler simply fell off from the tumba. Finally, almost the complete surface seems to be covered and more than 50% became loose.
In order to obtain a better bonding the plaster is mixed with woodglue as well. A lot of work…, a lot of drying time needed…, sanding, filling, drying, sanding, filling, drying, sanding…, fine sanding, sealing, colouring and finally the finishing touch with shellac.
Read more about tumba repair : click here
Cavitied G.Rosul gourd
The second tumba of this brandnew beginners G.Rosul sitar has been affected by worms. When the instrument fell down to the ground one day, the gourd got severely broken. Close examination revealed that a big worm has been digging a lot of tunnels through the gourds soft & dry flesh. At some points only the very thin outer peel (hard crust) has been left making this tumba extremely fragile. Where and when this worm got in and out the gourd is hard to find out. But certainly we don’t want this kind of destructive parasites inside our beloved instruments, nor in our house…
The repair of it started with filling up most of the tunnels with a mixture of fine wooden sawdust, water & woodglue. After that the outer shape could be restored using a mixture of wooden sanddust, plaster, woodglue & colourpigment. Finally came the sanding, colouring & the finishing with lacquer.
At this point I would like to notice that nowadays on more and more (cheap) sitars a synthetic sprayed lacquer finish is applied. The problem is that these synthetic solvents react very different with colourpigments that are used in the traditional shellac finish procedure (french polishing). Even worse, shellac doesn’t attach well to these chemicals. One is obliged to start determinating the kind of chemicals used in this spray, and look for eventual available alternatives which can be applied succesful to it. And I didn’t even mention the bad health aspects which might come along when working with these cheap synthetic mixtures…
But, what to do ? Just don’t buy it ?!! At least ask for traditional finish !!
Tuning problem: Cracked wood
On a traditional sitar, tuning is established by pressing a wooden peg (kuti) into a hole. Unfortunately the wood on this Barun Ray sitar is cleaved. There is a long and deep split line between the baj and jora kuti. Both strings were not keeping tune anymore. The pegs got loose too easy. How this has happened is difficult to say. Maybe during a transport something has been hitting the kutis and made the wood split. Or maybe that the wood was already damaged at the moment of selection or during the construction of this sitar. Thus weakened, it may got easily split caused by the high pressure coming from the kutis being squeezed into the hole during tuning activities.
But the repair of this defect is not so difficult. First thing to do is to remove the decoration along the head. Then split the upper head plate from the latter curved neck piece.
Repair the crack with glue and, at the same time I ‘ve added a reinforcement piece of wood on the inside. On this piece the grains are running in a perpendicular direction in relation to the wood of the head plate.
Close the head and fix the deco. Finally drill the hole and clean it.
Finish with some fresh shellac and fit the kutis again. Done…
Tarav Mogara repair page
I’ve added an illustrated report about the repair of tarav mogaras. These are small, round ducts which lead the tarav strings through the neck towards the tarav kutis. They are usually made out of bone or horn. Sometimes plastic is used.
Due to a very high tension coming from the tarav string which is laying on the rim, these ducts get used sooner or later. Finally they will break, and then there is nothing left to prevent the string from cutting into the wood.
So, sometimes, these tiny fragile pipes need to be replaced. Or, if you are lucky and they didn’t break (yet), they can be re-used by rotating them over 90°.
How to do? See page Tarav Mogara Repair at the Repairs section…
Surbahar Kuti Repair
Photo report of a Kanailal & Brother surbahar kuti repair.
The main kutis of this surbahar are very specific. The surface is smooth and only cut with a saw. Original Kanailal replacement kutis are hard to find. When it is broken, repair is the most obvious solution. In this case it affects a cikari kuti. Note the peculiar position on the neck: it is mounted between the first and second tarav kuti.
Kutis are made out of sheesham (sissam) wood. This is a variety of Indian rosewood (Dalbergia sisso) which grows in the Himalayan foothills to Central and South India. Surbahar kutis are rather long. I used a 18cms long piece for this work.
1. Start with looking for a suitable piece of wood.

2. Cut the ball with a saw, sand the surface smoothly and mark the center precisely.

3. Drill a hole exactly in the center. (8mm diameter)


2. Cut the ball with a saw, sand the surface smoothly and mark the center precisely.

3. Drill a hole exactly in the center. (8mm diameter)

4. Make this hole square with a chisel.

5. Make one end of the piece of wood square as well (8x8mm) and make it fit exactly into the ball.

6. Apply wood glue and lock it into a clamp. Give sufficient time to completely dry out. (24hrs min.)


5. Make one end of the piece of wood square as well (8x8mm) and make it fit exactly into the ball.

6. Apply wood glue and lock it into a clamp. Give sufficient time to completely dry out. (24hrs min.)

7. Remove the clamp and start making the shaft round.

8. Finish the joint and make the kuti fit nicely into the instruments neck.

9. Apply some new lacquer (Shellac) over the joint and fix the original deco pin on top.


8. Finish the joint and make the kuti fit nicely into the instruments neck.

9. Apply some new lacquer (Shellac) over the joint and fix the original deco pin on top.

See more kuti repair here.
Kartar Chand vintage sitar repair
In 2009, Hari Chand presented me an old sitar which has been originally made by him and his brother, late Kartar Chand, in the 1970’s. The sitar suffered severely from a loose joint due to “an unfortunate fall from a kitchen table”…, dixit the former owner. How peculiar that no other parts of the instrument were broken. Since the owner wasn’t interested in this sitar anymore I was the lucky one to receive it.
During the second half of this year I finally found the time to repair and fully restore this instrument. Here are some pictures about the more spectacular part of the process. For this occasion I installed my home-made steam injector again. It has been serving me well in the past (click here), although its use is not always completely without risk. The steam can be very tricky and cause severe burns quickly. But everything went well. As for the joint itself: the wood was split at 2 positions due to an earlier joint adjustment. That’s why I decided to insert a completely new piece of wood.
Now this sitar is completely repaired and carefully renovated, ready to start a new life. It is a very light weight instrument, decorated in a very refined and exquisite way. There are 20 pardas, 12 taravs and a high quality staghorn jawari. The sound is superb, bright and clear, with an incredible tarav response. Well-known qualities for all sitars built by these two excellent craftsmen-brothers!
Naskar tun sitar
Old Naskar so called “teak sitar…??” turns out to be a regular tun sitar. This sitar has been repaired from a loose joint and twisted neck. Also the tabli has been lowered and the neck has been finished in an open pore look with 6 layers of Danish oil. Almost full restoration… see pics after: